
The question I get the most often is not “How should I prioritize my stats” or “Can you write this Weak Aura for me”, it is “How do I tank Horridon as a Brewmaster?” There’s no doubt that it’s a difficult fight for most tanks, and monk tanks face their own unique challenges. But it’s also my favorite fight this expansion, explicitly because it’s requires mastery of two basic tank skills: add pickup and predictable damage mitigation.
My own experience for this fight includes: wiping on normal many times before we got it, then wiping on heroic many, many more times. We’ve finally downed it, but it took a lot of experimentation and practice.
Tanking Horridon
Horridon occasionally attacks (as Threehorns are wont to do) with Triple Puncture. Besides dealing moderate damage, it also inflicts his target with a stacking debuff that increases the damage of the next Triple Puncture. In most cases, you will have to take this debuff to 8 or 9 stacks before the other tank has a chance to taunt or a paladin can cast Hand of Protection on you. Horridon uses Triple Puncture roughly every 10 seconds, and the debuff lasts 2 minutes.
At first, the Triple Puncture attack deals deceptively little damage. However, the danger actually comes from the melee swing before + Triple Puncture + the melee swing after. These three attacks can happen in less than two seconds and can often take you from 100% health to 0% with hardly any time to react.
So how do you deal with this massive physical burst? First, we need to gear for it. The best stats to smooth your damage intake are mastery and stamina, and you’ll need both. If you often die in the blink of an eye, first try using two stamina trinkets, a stamina flask, and stamina food. If that’s not enough, reforge to mastery (use this priority: hit/exp to cap > mastery > crit > haste). Mastery is becoming an increasingly amazing stat in Throne of Thunder, and it will be useful for most of the other fights in this raid. The one downside is that, unlike haste or crit, it does not increase your damage output. But you should worry about surviving first.
Next, plan out your cooldowns and active mitigation.
- Shuffle should be up at all times, especially before a Triple Puncture.
- Use Purifying Brew often. However, if you have to choose between keeping Shuffle up or Purifying a Stagger, keep Shuffle up. Burst is the true killer here.
- Save Expel Harm and Chi Wave for after the Triple Puncture. Try to avoid the temptation of using them at other times, even if your health dips low. Horridon hits slow and hard, so your health will often dive even when a Triple Puncture is still a few seconds away, but this in-between damage is easily covered by your healers, so you have to trust them to keep you topped off. The one exception is if you’re not topped off immediately before a Triple Puncture.
- Elusive Brew can’t prevent the Triple Puncture, but it has the chance prevent the melee attacks that frame it. Use it a few seconds before Triple Puncture and you will hopefully dodge one or two of those dangerous melee swings.
- Save cooldowns like Guard, Dampen Harm, Fortifying Brew, and Zen Meditation for high stacks of the debuff (6+).
- Hand of Protection can remove these stacks, so you can coordinate with any paladins in your raid if you want to remove stacks early. Remember that this leaves Forbearance, which prevents any other Hands for 1 minute.
One other thing to keep in mind are to watch your vengeance. You’ll have a huge amount of attack power while tanking Horridon — much more than your co-tank on adds. Try not to pull off your co-tank because they have a hard enough time already. Also, if a dinomancer appears next to you, interrupt it.
Finally, when all four doors have collapsed, War-God Jalak will appear. He melees hard, but is not quite as dangerous as Horridon. I’ve heard reports that he is disarmable, so use Grapple Weapon and Ring of Peace on him. Tanking him is pretty straightforward, but once he dies Horridon will hit twice as hard and much faster, so you need to chain cooldowns until the end of the fight, and possibly call for help from your healers.
Picking up the Adds
Add management is one of my favorite tasks as a tank, and sadly it does not appear often outside of five-man dungeons. Brewmasters often have a hard time of it because we don’t have any instant ranged attacks except for taunt, but we have enough tools to make do.
First of all, remember to not panic. The adds that spawn from the door usually don’t hit very hard, so it’s not the end of the world if one of your ranged dps pulls them.
Here are those tools:
- Dizzying Haze: Has a travel time and requires aiming, but deals a decent amount of threat and doesn’t require you to move around to pick up adds.
- Provoke: Our taunt is the most reliable way to pick up adds, but you have to use it wisely. Save it for times a dps or the other tank pulls off you.
- Provoke off of Ox Statue: As long as it’s placed far enough from Horridon (you don’t want to accidentally taunt the boss and he has a deceptively large hitbox), you can use it to pick up more than one add. Sadly, using it as an AoE pickup tool means you can’t use it again to pull off of unruly co-tanks, which makes it more situational.
- Chi Torpedo: We don’t normally have many uses for this skill, but it is excellent at picking up regularly spawning trolls, especially because you’re likely to be moving around a lot anyway. It has an effectively short cooldown (since it’s tied to roll) and deals a decent amount of damage.
- Rushing Jade Wind: This is our fastest ranged pull tool, though unfortunately it requires good aim and two chi. The spell effect is wider than the visual, so your aim doesn’t have to be perfect. It deals a large amount of damage, which makes pickup near-guarenteed. I prefer this over Chi Torpedo, but Chi Torpedo is especially nice if you’re having trouble picking everything up.
- Charging Ox Wave: This skill doesn’t generate threat and it only works on trolls that spawn out of the doors (as opposed to the trolls that jump from above), but it can delay those enemies long enough for you to run over and Keg Smash or aim a Dizzying Haze.
- Clash. This charge / death grip combo is usable on the door adds, but not the adds that jump from above.
Weaker Tools:
These skills aren’t ideal, but good to keep in mind.
- Spinning Crane Kick: It can be rough using this tool because you have to move nearby and it prevents any other actions for a few seconds, but sometimes it’s your only option if the other abilities are on cooldown. It’s usefulness comes from it’s lack of cooldown.
- Chi Burst / Chi Wave: Both healing talents can be targeted at range, but Chi Burst has a long cooldown and a cast time, while Chi Wave has only a 20 yard range.
- Tiger Palm: If you are too busy to check what’s off cooldown and you don’t have time for a full cast of Spinning Crane Kick (it happens to me…), Tiger Palm is always usable and often deals enough damage to get initial threat.
Now, keep those in mind while I talk about troll spawn patterns. Each door follows the same pattern, though obviously each group has their own special abilities. Knowing the patterns can help with timing your ranged pulls and plan your taunts.
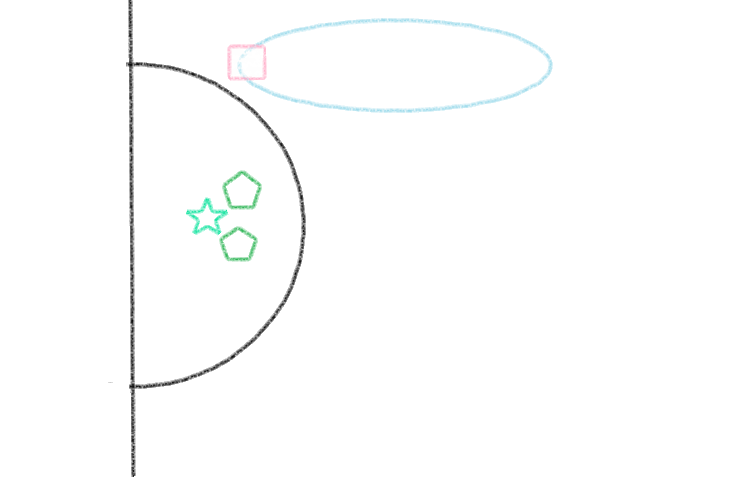
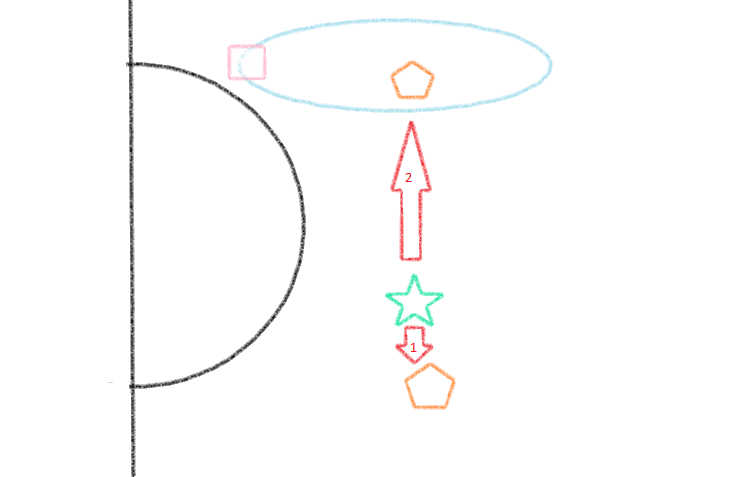
Spawn 1: One to two troll adds (depending on the gate) come from the door. These guys are stunnable and usually don’t deal much damage. If there’s more than one, they are still close to each other and easy to pick up with just a Keg Smash.
The blue circle represents Horridon and the pink square represents your co-tank. Your guild may choose to put Horridon in a different spot, and that spot may even vary at different gates, but you’ll still have to worry about adds dropping on top of your co-tank. The turquoise star represents where you should stand.
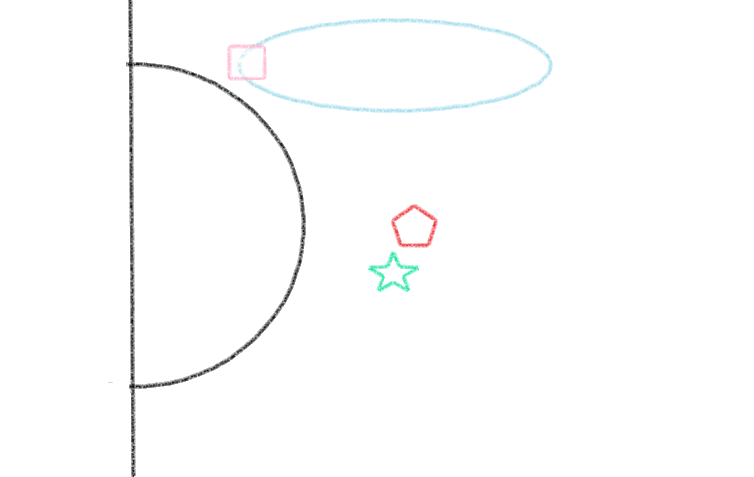
Spawn 2: A single special troll drops from above. These are usually the highest priority targets, so you need to pick them up before a damage dealer pulls it. Since it’s just a single spawn, it should be easy to pick up with your regular attacks or a taunt.
Spawn 3: More trolls spawn from the door. Pick them up with Dizzying Haze. You should prepare for spawn 4 by moving near where they drop down.
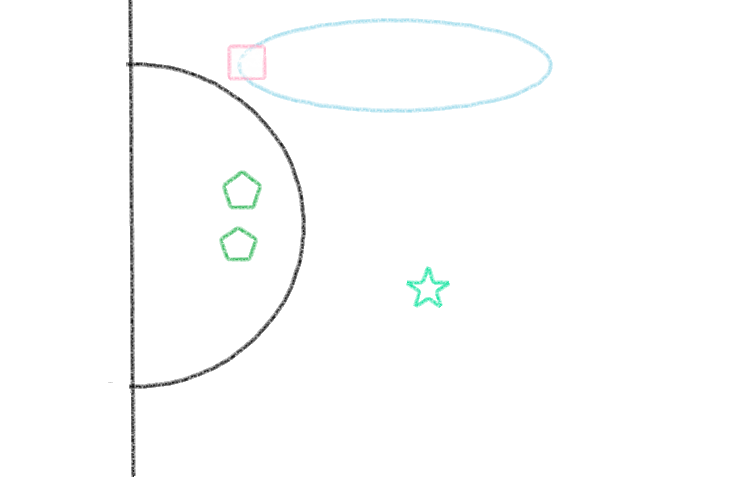
Spawn 4: Two special trolls drop from above. This is the most difficult pull. First, use one of your best pick up tools (Keg Smash if you’re in range, Rushing Jade Wind if you’re not) on the add the drops near the raid. Second, use your taunt on the add that heads to the other tank. You often have to use a taunt on the add that’s close to your co-tank because none of your other skills will be able to overcome the vengeance lead they have on you, even if you’re Keg Smashing and they’re just doing incidental cleaves.
Spawn 5: Dinomancer spawns. If you have to pick it up, then taunt it over. It will likely head for your co-tank, but it’s the last big thing to spawn so you should be safe to use taunt.
Spawn 6+: No more special trolls or dinomancers, but the spawns at the door will continue until Horridon destroys the gate. Continue to throw Dizzying Haze at them when you see them run out the door.
Gate-Specific Hints
Gate 1 – Desert Trolls: The basiliks that spawn from the gate can stun you. You can either interrupt their cast, run behind them, or break the stun with Nimble Brew. Stay out of the sand on the ground.
Gate 2 – Poison Trolls: Try to pick up the green, semi-transparent Venomous Effusions. There’s usually many mobs up, so it’s not worth it to taunt unless you can do an AoE taunt off your statue.
Gate 3 – Ice Trolls: You only need to pick up the Frozen Warlords, but you can use your AoE taunt to pick up other mobs momentarily. Warlords hit very hard and apply a healing debuff, so this is a good time to use cooldowns as well. Also, kite them along the wall so that they drop their Frozen Orbs away from the raid.
Gate 4 – Bear Trolls: The bears cleave, so don’t move around too much and keep them facing away from the raid. Once the bear dies, its rider will drop and you’ll have to reestablish aggro. A well-timed Spinning Crane Kick will usually do the trick.
Talents
Here are the talents I chose.
- Tier 1: All are useful.
- Tier 2: Chi Wave, primarily for the self heal.
- Tier 3: All are up to personal preference.
- Tier 4: Charging Ox Wave, for ranged pick-up and AoE stun. Ring of Peace is also a good choice.
- Tier 5: Dampen Harm for Horridon’s big Triple Punctures.
- Tier 6: Rushing Jade Wind, for ranged add pick-up and AoE dps. Chi Torpedo is also a good choice while learning the fight.
Other Miscellaneous Things
Transcendence is very useful for this fight. You can either drop it on various spawn spawns for fast pick up, or near the boss in case you get targeted by Charge.
You will have to replace your Ox Statue at every gate due to range. You can place it within the gate semi-circle to help with AoE taunts or just a distraction for those adds, or you can place it where one of the special adds will drop down.
In heroic mode, the boss will occasionally spawn a Direhorn Spirit. As a tank, you don’t have to worry about this until the very end. If you do get one, you can knock it back with any attack, including taunt. I preferred to occasionally throw a Dizzying Haze or Rushing Jade Wind at it because I was worried I’d accidentally taunt the boss.
Video
