
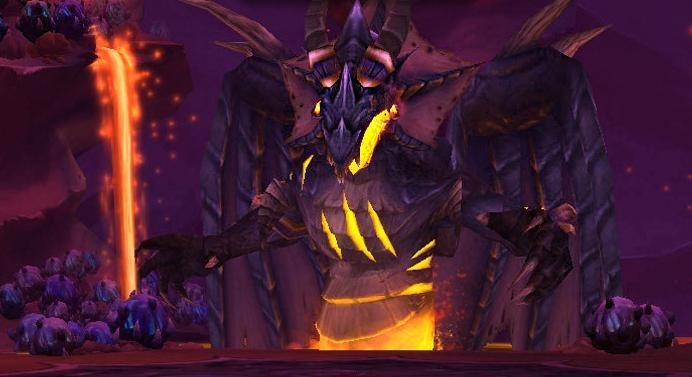
This is what I’ve gathered from scouting around the internet and from personal experience about Sinestra, Consort of Deathwing, the unlockable heroic-only boss at the end of Bastion of Twilight. As with most my guides, this is from a tanking perspective, though I try to include as much non-tanking aspects as I can.
She’s pregnant, stuck in lava, and you’re threatening her babies. You’re in for a world of hurt.

General Info
- 2 tank fight
- I did this fight with 173k as a druid, other non-druid tanks will probably need a bit more health. I used a stamina trinket, Mirror of Broken Images, and a Prismatic Elixir/Elixir of the Master combo.
- A paladin is the best tank for adds, because they can bubble off the debuff.
- High dps requirements, so only 5 to 6 healers are advised.
- Due to her positioning, it can difficult for melee dps to get behind her. The tank needs to stand to the far right side (there’s a little ledge to stand on) so that the melee has plenty of room.
- Sinestra starts with 60% hp, but heals herself to full in Phase 2.
- She also starts with a debuff that reduces her damage done by 40%. This is removed in Phase 3.
Phase 1
- Things that happen:
- Flame Breath. Fire damage to the whole raid.
- Wrack. Debuff applied to one raid member. It lasts for 1 minute and does increasing damage the longer is stays on the target. When it is dispelled, it applies to two raid members.
- Twilight Slicers / Twilight Orbs. Two spawn on random players at a time.
- Twilight Whelps. Five spawn every 50 seconds, apply a stacking debuff, Twilight Spit, to the add tank.
- How to deal with things that happen:
- Flame Breath. Not a huge amount of damage in Phase 1 because of the 40% debuff on Sinestra, but it still needs to be prepared for and healed up.
- Wrack.
- Dispel every 10 to 18 seconds, depending on the target’s cooldowns and time until Flame Breath.
- One dpser should be assigned to dispels, with healers as backups.
- Add the debuff to your raid frames. Here is a Grid addon that also tracks the time Wrack has been on a target.
- Cannot be cast on tanks. Sometimes it bugs out and is cast on the add tank. If that happens, it needs to be removed immediately.
- Twilight Slicers / Twilight Orbs.
- The two afflicted players will have orbs linked to them by a thin purple tether.
- After a few seconds, the orbs will start Twilight Pulsing for around 30k shadow damage.
- Once a player recognizes that they’ve been tethered, they need to run toward the back of the room, away from the raid and the other afflicted player.
- Ideally, the afflicted players should kite around each other in such a way that maximizes dps time.
- There is no debuff associated with these, and it’s very difficult for addons to pick up who is afflicted with Twilight Orbs. You have to rely on your own eyes and look for the purple tether when they spawn.
- Cannot afflict the tanks.
- Twilight Whelps.
- Five spawn at a time, from nearly every direction. We had the healers stand in the same general area (because they always head to the healers first) to facilitate the pick up.
- The tank has to be very careful to avoid Twilight Slicers while picking them up.
- The debuff, Twilight Spit, increases shadow damage taken. Paladins can bubble out of this debuff, and they should after they die for the second time in phase 2. (Don’t use Lay on Hands if you’re healing the paladin tank!)
- Don’t need to be AoE’d until Phase 2.
- There will be two groups that spawn, for a total of 10 whelps. The tank will be getting hit very hard once all are up because of the debuff they leave, Twilight Spit.
- When they die the first time they leave puddles of Twilight Essence that revives them. They’re easy to AoE down, so just let them die in the puddle. They will revive, you will have to kill them again, and they will stay dead at that point. The puddle does a lot of damage, so stay out of it.
- Damage is relatively light during Phase 1, healers should dps if they have free time.
- This phase ends when Sinestra reaches 30% health.

Twilight Whelp
Phase 2
- Things that happen (roughly in order of appearance):
- Mana Barrier. Heals Sinestra to full, also effectively makes her immune to damage for the duration.
- Twilight Extinction. One shot K.O., raid needs to run to the back of the room and hide under a Fiery Barrier generated by your new best friend, Calen.
- Twilight Whelps are still alive at the beginning of the phase, and should not be killed until they reach the back of the room.
- Twilight Spitecallers spawn once the Fiery Barrier drops. They cast Unleash Essence.
- Two Pulsing Twilight Eggs become reachable.
- Sinestra casts Twilight Carapace, which protects the Pulsing Twilight Eggs from damage temporarily.
- Twilight Drakes will spawn. They have a frontal cone attack.
- Calen channels Pyrrhic Focus.
- How to deal with things that happen:
- Mana Barrier. Don’t bother dpsing Sinestra while this is up (unless Twilight Carapace is active, see below).
- Twilight Extinction. As mentioned above, run to the Fiery Barrier.
- Twilight Whelps should be AoE’d down early, while you’re running/hiding in the Fiery Barrier. They all need to die in the same spot, so don’t kill one early. There will be plenty of time to AoE them down later.
- Twilight Spitecallers should be picked up by the add tank or a dps (they only melee, and not for much). They cast Unleash Essence, which needs to be interrupted. However, when interrupted by normal interrupts or stuns (kick, skull bash, hammer of justice, etc), they gain Indomitable, which does damage and knocks the melee back (bad!). Instead, you have to use non-conventional interrupts (Gouge, Blind, Death Grip, Hibernate, etc).
- When Sinestra has Twilight Carapace active, the eggs cannot be damaged so the raid has to burn her down instead. Once enough damage is done to Sinestra, the eggs become vulnerable and the raid needs to switch to them again.
- As soon as Calen’s shield falls, the ranged and a handful of melee should damage Sinestra to remove Twilight Carapace.
- Two Pulsing Twilight Eggs should be dps’d once their shield is removed possible. Phase 2 ends when they die. You should aim to kill them before Twilight Carapace is activated a second time.
- Dps on the eggs has to be evenly split, and it is advised to use pots and cooldowns on them before the Twilight Carapace is refreshed.

Twilight Spitecaller

Pulsing Twilight Egg
- Twilight Drakes will spawn after the barrier falls and should be picked up by the main tank. They should be ignored by everyone else until after the eggs die. They do a frontal cone attack.

Twilight Drake
- Calen will need a healer due to Pyrrhic Focus during this phase. If he dies, Sinestra casts Twilight Extinction and the raid explodes.
- Healing is again light during this phase, and if all goes well the only healing targets should be the tanks and Calen. Other healers can dps.
- Phase 2 ends when the Pulsing Twilight Eggs die.
Phase 3
- Things that happen:
- Sinestra is again at full health and no longer has the 40% damage debuff. She hits exactly like you would expect an angry pregnant mother who is protecting her children and has a deep subconscious hatred for the dragon that did this to her should.
- Same as Phase 1 with Whelps, Flame Breath, Wrack, and Slicers.
- Twilight Drakes and Twilight Spitecallers might still be alive at the beginning of the phase.
- Calen casts Essence of the Red on the raid.
- How to deal with things that happen:
- Flame Breath can be dangerous for everyone, mostly for the tanks and the Wrack targets. As a tank, save minor cooldowns like Mirror of Broken Images for Flame Breath. Otherwise her melee attacks will kill you.
- The breath happens every 20 seconds, so you probably won’t have a cooldown available for every one. I typically saved my minor cooldowns for when I was either entering a Flame Breath with low health or my main healer was occupied by a Twilight Slicer.
- If you’re tanking Sinestra, use your major cooldown while the Twilight Drake is still alive. I used mine when there was about 8 seconds until the first Flame Breath. Your major cooldown will be up again right after Essence of the Red falls off, and should be used during a flamebreath during that time frame.
- Finish up remaining adds (Twilight Drakes, Twilight Spitecallers) during the transition.
- Essence of the Red lasts 3min, and ideally Sinestra should be around 20% by the time it falls off. It gives healers near-infinite mana, so they should spam their expensive, high throughput heals for its duration.
- Once Essence of the Red falls off, it will be much more difficult to keep the raid alive. Tanks should use cooldowns during Flame Breaths to stay alive.
- Whelp waves need to be either AoE’d or kited so that they don’t overwhelm the add tank. We kited the adds around the back and killed them individually. Warlocks were responsible for DoTing, with another ranged damage dealer responsible for killing them at the right time. You can see how they were kited in my video.
- A paladin tank does well here because they can bubble off Twilight Spit. You can also do a tank swap partway through so that stacks of Twilight Spit are manageable.
- The Twilight Essence puddles left by dead whelps expand constantly. New whelps should not die in puddles.
- Near the end, it is advised for the dps to ignore whelps and burn the boss.
Extra Resources
FeralTree’s Blog.
Plusheal Forum.
Wowhead’s Article.
Learn2Raid’s Video